
As autumn leaves begin to fall and a crisp chill fills the air, thoughts inevitably turn to one of the season’s most beloved traditions: pumpkins! While carving is a classic, pumpkin ideas for painting offer a fantastic, mess-free, and often more durable alternative, allowing for intricate designs and vibrant colors that simply aren’t possible with a knife. Whether you’re a seasoned artist or just looking for a fun family activity, painting pumpkins lets you express your creativity and add a personalized touch to your fall decor. Forget the sticky guts and sharp tools; grab a brush, some paint, and let’s dive into a world of endless possibilities to make your pumpkins truly shine!
Why Painting Your Pumpkins Matters: Beyond Just Decoration
Opting for pumpkin ideas for painting offers several advantages over traditional carving, making it a popular choice for many.
- Longevity: Painted pumpkins last significantly longer than carved ones, which quickly rot once exposed to air.
- Safety: No sharp tools are needed, making it a perfect activity for kids of all ages.
- Versatility: Paint allows for more detailed and diverse designs, from intricate patterns to realistic characters.
- Less Mess: Say goodbye to sticky pumpkin guts and seeds all over your kitchen.
- Indoor & Outdoor Appeal: Painted pumpkins look great both inside as festive decor and outside on your porch.
- Customization: You can easily match your painted pumpkins to your home’s aesthetic or a specific theme.
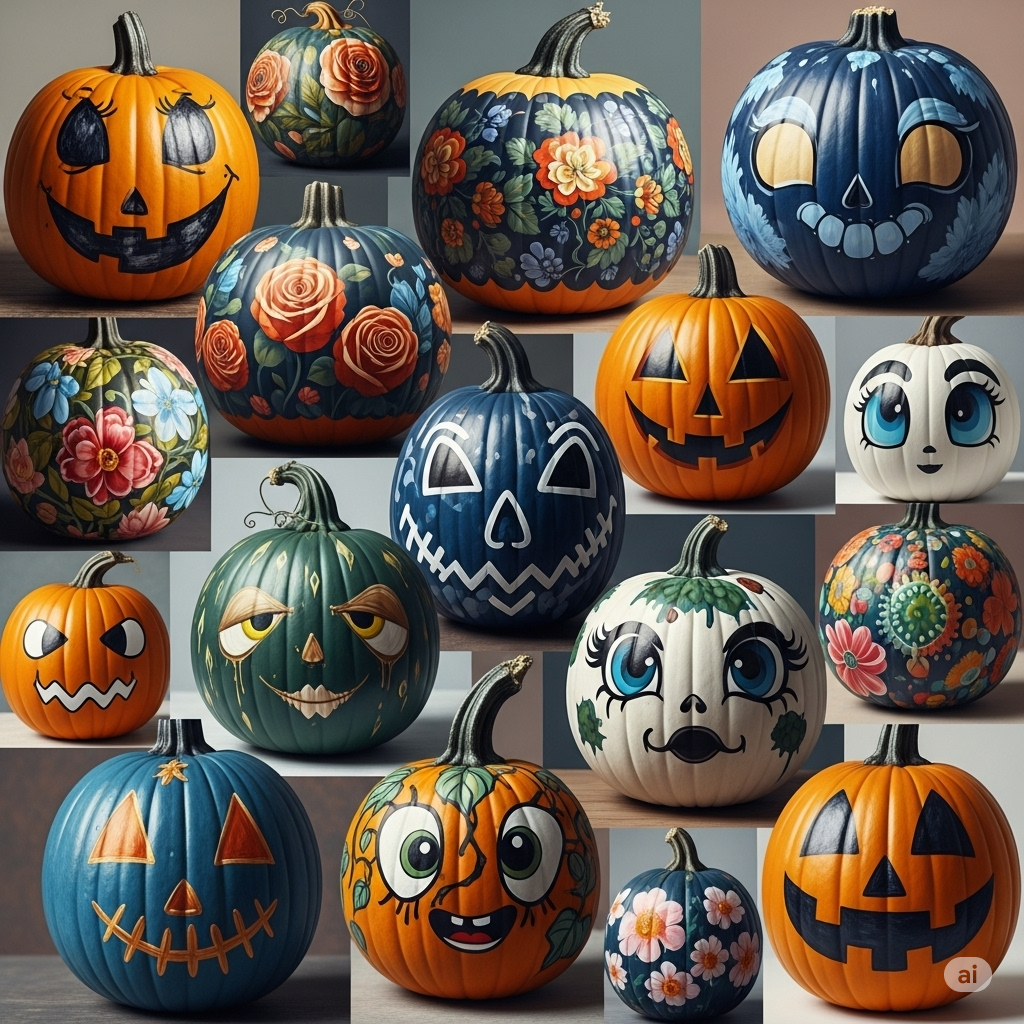
Pumpkin Ideas for Painting
When it comes to pumpkin ideas for painting, the possibilities are truly limitless. Here are distinct categories to spark your imagination and help you create stunning autumnal masterpieces.
Spooky & Ghoulish Pumpkin Painting Ideas: For a Hauntingly Good Display
Embrace the spirit of Halloween with these eerie and creative pumpkin ideas for painting. Perfect for setting a frightful mood!
- Classic Ghost Faces: Simple white paint on an orange pumpkin with black eyes and a wavy mouth.
- Spiderweb Design: Paint a black spiderweb across the entire pumpkin, adding a plastic spider for extra effect.
- Vampire Fangs: Paint a red mouth with two sharp white fangs at the bottom of the pumpkin.
- Frankenstein’s Monster: Green base coat with black stitches, bolts on the sides (use painted cardboard or actual screws), and a flat black hairline.
- Mummy Wrap: Paint the pumpkin white, then add irregular black lines to mimic bandages and cut-out eyes.
- Haunted House Silhouette: Paint a black silhouette of a spooky house and bare trees against an orange or purple background.
- Zombie Face: Use grey-green paint for skin, add sunken black eyes, and ragged teeth.
- Evil Eye: A single, large, menacing eye painted with a vibrant iris and a dark pupil.
- Bloody Handprints: Red paint applied as handprints, as if someone pressed their hand against the pumpkin.
- Skeletons & Skulls: Paint a detailed skull face or a small skeleton figure onto your pumpkin.
- Bat Silhouettes: Paint several black bat silhouettes flying across the pumpkin.
- Witch’s Hat & Broom: Paint the top of the pumpkin black like a witch’s hat, and draw a broomstick beside it.
- Monster Teeth: Paint jagged, sharp teeth around the pumpkin’s mouth area, perhaps with some dripping green slime.
- Gothic Lace: Use black paint or stencils to create intricate lace patterns.
- Cemetery Scene: Paint tombstones, bare trees, and maybe a lone crow in black silhouette.
- Grim Reaper Face: A hooded, shadowy face with glowing red eyes.
- Creepy Clown Face: White base, exaggerated red smile, and haunting eyes.
- Eyeball Swirls: Paint multiple eyeballs of different sizes swirling around the pumpkin.
- Toxic Slime Drip: Use neon green or yellow paint to create drips from the top down.
- Black Cat Silhouette: A classic black cat with arched back and glowing yellow eyes.
Cute & Whimsical Pumpkin Painting Ideas: Family-Friendly Fun
These adorable and cheerful pumpkin ideas for painting are perfect for adding a touch of charm and playfulness to your autumn display.
- Polka Dots: Simple, colorful polka dots of various sizes.
- Stripes: Vertical or horizontal stripes in contrasting colors (e.g., orange and white, black and white).
- Candy Corn Theme: Paint the pumpkin in sections of yellow, orange, and white.
- Animals: Turn your pumpkin into a fox, owl, cat, or friendly monster. Add ears with felt or cardboard.
- Donuts/Cupcakes: Paint the top like frosting with sprinkles, adding a cherry on top.
- Fruit or Veggies: Transform it into an apple, watermelon, strawberry, or even a giant pea pod.
- Emoji Faces: Paint popular emoji expressions on small pumpkins.
- Unicorn: White base, glitter, pastel swirls, and a painted or cardboard horn.
- Gnomes/Fairies: Paint a tiny door and windows, turning the pumpkin into a whimsical home.
- Superheroes: Paint logos or character masks (e.g., Batman, Spiderman, Wonder Woman).
- Rubber Duck: Paint it bright yellow with an orange beak and black eyes.
- Hot Air Balloon: Paint colorful stripes and add a small basket (cardboard) at the bottom.
- Galaxy/Stars: Black or dark blue base with white splatters for stars and swirling nebulae.
- Bumblebee: Yellow and black stripes, add tiny wire antennae.
- Ladybug: Red base with black spots.
- Rainbow: Paint vertical or horizontal rainbow stripes.
- Button Eyes & Stitches: Give your pumpkin a “Rag Doll” look with large painted buttons for eyes and stitch marks for a mouth.
- Owl Eyes: Paint large, round owl eyes and feathery patterns.
- Robot Face: Use metallic paints and geometric shapes for eyes and mouth.
- Friendly Monster: Googly eyes, a big smile, and perhaps some painted horns.
Elegant & Sophisticated Pumpkin Painting Ideas: Chic Autumn Decor
Elevate your fall decor with these stylish and refined pumpkin ideas for painting. Perfect for a more mature and aesthetic display.
- Metallic Accents: Paint entire pumpkins in gold, silver, or copper, or add metallic details.
- Ombre Effect: Blend two or three colors seamlessly from light to dark or vice versa.
- Monogrammed: Paint your initial or family monogram in an elegant font.
- Chalkboard Paint: Paint the pumpkin with chalkboard paint, then write messages or drawings with chalk.
- Glitter Bomb: Cover the pumpkin in glue and then generous amounts of glitter.
- Lace Overlay: Use stencils or actual lace fabric to create delicate patterns.
- Floral Designs: Paint intricate floral motifs, leaves, or vines.
- Abstract Art: Use splashes, swirls, and geometric shapes in complementary colors.
- Buffalo Plaid: Classic red and black (or other colors) plaid pattern.
- Marble Effect: Use water marbling techniques for a unique, sophisticated finish.
- Faux White Pumpkins: Paint orange pumpkins solid white for a farmhouse or minimalist look.
- Gilded Stems: Paint just the pumpkin stem in gold or silver for a touch of elegance.
- Negative Space Design: Paint the background, leaving the pumpkin’s natural color to form a design.
- Damask Pattern: Use stencils to create elegant, repeating damask designs.
- Wood Grain Effect: Paint to mimic the texture and lines of wood.
- Subtle Stripes: Thin, elegant stripes in muted tones.
- Gingham Pattern: A classic checkered pattern in soft colors.
- Leaf Silhouettes: Paint different autumn leaves (maple, oak) in metallic or contrasting colors.
- Geometric Patterns: Triangles, diamonds, chevrons in a modern palette.
- Pearlescent Finish: Use pearlescent paints for a subtle shimmer.
Crafting the Perfect Painted Pumpkin / Pro Tips for Your Pumpkin Ideas for Painting
To get the best results from your pumpkin ideas for painting, follow these practical tips.
- Clean Your Pumpkin: Wipe it down with a damp cloth and dry it thoroughly before painting to ensure paint adheres well.
- Prime if Necessary: For lighter colors on dark orange pumpkins, a coat of white primer or gesso can help your chosen color pop.
- Use the Right Paint: Acrylic craft paints work wonderfully and dry quickly. Spray paint is great for base coats but needs to be done in a well-ventilated area.
- Work in Layers: Apply thin, even coats of paint instead of one thick layer to avoid drips and ensure quick drying.
- Let It Dry: Allow each coat or color section to dry completely before applying the next, especially for detailed work.
- Protect Your Surface: Lay down newspaper, cardboard, or a drop cloth to protect your workspace.
- Use Quality Brushes: A variety of brush sizes will help with both large areas and fine details. Foam brushes are great for base coats.
- Consider Sealant: Once your masterpiece is dry, a clear, waterproof sealant (spray or brush-on) will protect the paint and make your pumpkin last longer, especially if displayed outdoors.
- Think About the Stem: Don’t forget to paint the stem, or even add glitter or ribbon to it, for a finished look.
- Sketch First: For complex designs, lightly sketch your design onto the pumpkin with a pencil before applying paint.
- Use Stencils: Stencils are excellent for creating intricate patterns, lettering, or shapes if freehand isn’t your strong suit.
- Add Embellishments: After painting, consider adding glitter, gems, ribbon, fabric pieces, or even small plastic spiders for extra flair.
Conclusion
Pumpkin ideas for painting offer a fantastic way to celebrate autumn and Halloween without the mess and short lifespan of carved pumpkins. From spooky specters and adorable creatures to elegant patterns and shimmering metallics, there’s a painting style for every taste and skill level. By embracing these creative approaches and following a few simple tips, you can transform ordinary pumpkins into extraordinary works of art that enhance your seasonal decor. So, gather your paints, unleash your imagination, and get ready to create a truly unique and memorable pumpkin display this fall!
FAQs: Your Top Questions About Pumpkin Ideas for Painting Answered
Q1: What kind of paint is best for pumpkin ideas for painting?
A1: Acrylic craft paints are generally the best choice for pumpkin ideas for painting. They adhere well to the pumpkin’s surface, dry quickly, and come in a vast array of colors. Spray paint can also be used for base coats.
Q2: How long do painted pumpkins last?
A2: Painted pumpkins can last much longer than carved ones, often for several weeks to a few months, especially if kept in a cool, dry place and treated with a sealant. Carved pumpkins typically only last a few days to a week.
Q3: Do I need to prime my pumpkin before painting?
A3: While not always strictly necessary, applying a coat of white primer or gesso is highly recommended for pumpkin ideas for painting, especially if you’re using lighter colors or want the colors to appear more vibrant on an orange pumpkin. It helps the paint adhere better and reduces the number of coats needed.
Q4: Can I use regular house paint for my pumpkin ideas for painting?
A4: You could, but it’s not ideal. Regular house paint might be too thick, take longer to dry, and may not offer the same vibrant color payoff or adhesion as acrylic craft paints. It’s best to stick with paints specifically designed for craft projects.
Q5: How do I protect my painted pumpkin from the elements?
A5: To protect your painted pumpkin, especially if displaying it outdoors, apply a clear, waterproof sealant after the paint has fully dried. Both spray-on and brush-on sealants designed for craft projects work well. Keeping it in a sheltered area away from direct sun and heavy rain will also extend its life.

As a Product and SEO Specialist, I focus on building impactful digital experiences and driving organic growth through data-driven strategies. With hands-on experience in developing user-centric tools, managing high-traffic blogs, and executing successful SEO and growth campaigns, I’ve helped increase website traffic by over 50% and resolved critical technical issues like phishing attacks. I enjoy working at the intersection of product, marketing, and technology to solve real-world problems and deliver measurable results.